Friday, September 04, 2009

How to Make-Over a Glass Lazy Susan, part 3

  1. Decide you're not going to let that st*pid paint get the best of you. You'll use cutouts from that hydrangea paper on something, but not this blasted lazy susan.
  2. Try removing the fruity "paint" with acetone nail polish remover (husband's idea). FAIL
  3. Try removing the fruity "paint" with a pink-handled razor blade. FAIL

  4. Accidentally scratch paint you actually want on there, when removing lazy susan from sink. FAIL


  5. Check out mineral spirits and paint thinner at Wal-Mart. Budget FAIL
  6. Find the perfect all-purpose spray-on primer at Michael's. WIN
  7. Forget 40% off coupon, necessitating return trip. FAIL
  8. Realize that you can now justify a return trip to Lexington on Monday, thereby creating an excuse to get free Chick-Fil-A sandwiches. WIN
  9. In the meantime, do another project!


How to Make Your Own Dry-Erase Calendar
  1. Find or buy an oblong frame.

  2. Remove the "innards" (mat, background paper, etc.) and paint the frame, if desired (AKA "if you remember before fastening it all back together and writing this tutorial"). While it's drying, clean the glass on both sides with Windex. Don't let your cat sit on it.
  3. Decide on a layout and dimensions for your calendar (my glass was 18"x34", and my margins were 1.25", so my calendar was 15.5"x31.5"; each column was 4.5" wide, the days of the week row was 2" tall, the main space was 10.5" tall, and the "next week" row was 3" tall; I arbitrarily drew the header for the "next week" row).

  4. Take a Sharpie, a ruler or yard stick, and (if you're lucky) a large ruled cutting board and mark out the lines and words you want as default on your calendar on the wrong side of the glass.

  5. If you severely screw up, use some acetone nail polish remover on a Q-Tip to "erase" your mistakes (or, if you're lucky enough to be drawing on a removable protective plastic film, just smudge it off).

  6. When your toddler wakes up from his nap, take a break for a day or two because your project is "on top of the road, mommy".

  7. Turn the glass over and carefully trace over all of your lines and words with a Sharpie. Consider using different marker widths (I used a Fine Point, a Chisel Tip, and a Magnum 44). Do any designs or decorations you want permanently on the calendar (leave it decorationless if you want to customize it monthly or seasonally).

  8. If, hypothetically, you hate any impromptu decorations you try to do with dry erase markers, be sure to scrub them off with a dry paper towel. While the term "dry erase" may seem misleading, it actually won't come off when you use something wet, like, oh, nail polish remover. I'm just sayin'.


  9. Check for Sharpie flubs and fix them with acetone nail polish remover on a Q-Tip.
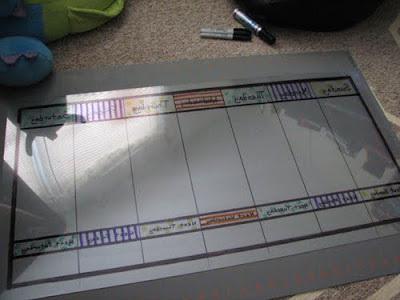
  10. Ask your supervisor if he thinks your project is acceptable.

  11. Turn the glass back over and (if applicable) remove the protective film. If you want to erase your guidelines from step 4, do it now using acetone nail polish remover (don't get any on the back).

  12. Realize that, contrary to the test patch and general common sense, the dry erase marker used for decorating did, in fact, rub off some of the Sharpie.

  13. Fix it on the "right" side of the glass.

  14. Fill in your week's activities, with accompanying pictures for your toddler's benefit.


  15. Get really excited when your toddler recognizes your sketch of a Batman mask (to signify that he's going to play with a friend, who has one) — WIN. Realize that your reflection is showing up in your pictures — FAIL. Feel relieved that you're clothed — WIN.


We really needed a large weekly calendar to start using for family things, and to help teach Caspian about the days of the week (and make it less confusing when we say, "We're doing ___ on Tuesday"). Imagine my happiness when I saw this entry for this contest! We even had a suitable frame sitting around unused (albeit with plexiglass instead of real glass, but it passed the marker test). I'd originally purchased it to make a gift for my college French professor, but that never happened.

The great thing about this project is that you can customize your dream calendar (time span, labels, dates/days, etc.). Now I just have to figure out what to do with the leftover mat. Any ideas? It's pretty flimsy, but it's white on both sides (one matte, one shiny). I keep wanting to cut out each individual "frame"...but for what...?


This is another neat weekly calendar idea, especially to use for older children! Can't you just see each child's cube stacked on top of or laid next to each other on top of a little shelf above your family's regular calendar?

Wednesday, September 02, 2009

"Works for Me Wednesday" - Organizing


Organizing: My Kitchen Pantry

I recently got fed up with my plastic food storage cabinet and my free-standing pantries. We couldn't see what we had, and there was never enough room for what we wanted to put in there. I took two days to take everything out of all three cabinets, lay it out on the kitchen table, re-organize it by category, and then put it back in and labeled the shelves with my Dymo.

The countertop-sized appliances (panini maker, George Foreman grill, Henrietta Hen, etc.) went on the shelves in the cabinet under the microwave, where the plastic food storage had been. The appliances are all large enough to be visible without having to move stuff around, and the cabinet isn't the easiest to look into at a glance — a perfect match.

The plastic food storage got weeded out (hallelujah). Identical stackable pieces got stacked together with all their nesting lids on top. Everything else got its lid put on top of it (to save matching time later) and stacked according to shape/size. Most-used medium-size containers got put on a lower shelf in the pantry, while large ones got stacked on top of the tall pantry (tiny ones got thrown into a basket on top of the pantry).

The categories that needed to be visible (canned goods, sweet snacks, savory snacks, crackers) because we keep forgetting what we have and buying more (or letting them go stale) got put on eye-level shelves. The categories that aren't used often or don't need to be visible because we always know they're there (breakfast, baking, chips, etc.) got put on high or low shelves.

All candy/tiny snacks got sorted into the plastic-storage-I-wanted-to-keep-but-never-used-for-leftovers, so it could be stacked for efficiency and ease of browsing...and so all our candy doesn't end up smelling like mint (which, if you've ever stored all your Christmas candy in one jar or bag before, you know will happen). Even new bags of M&Ms get dumped into their own container. Ahh, order.

Every shelf got labeled so my new order can be maintained by grocery-put-awayers.

It feels great to have all that stuff finally purged and organized, but heck, any day you get to use a label maker is a good day! LOL

Tuesday, September 01, 2009

How to Make-Over a Glass Lazy Susan, part 2
  1. Avoid additional painting for two days because you're paralyzed by the thought of "screwing up".
  2. Conclude that the first 5.1 coats weren't opaque enough to cover the fruit from every angle (especially when light shines behind it...which it won't if it's set on the table, but...). Consider découpaging instead of painting more.

  3. Ask husband's opinion (he votes "découpage"); get grapes from fridge for sustenance.
  4. Research technique online and find the website for "The National Guild of Decoupeurs" (who knew?). Read through their FAQ, then head to Craftown.com instead.
  5. Look through "Découpage-able" drawer (yes, it's labeled that way) for inspiration.
  6. Find a great poem on an old wedding card, but no background materials.

  7. Realize in a flash that you have three humongo storage tubs of gift wrap to plunder! Research "découpaging gift wrap" and find Durwin Rice's site. Get distracted there, then check out Mod Podge online.
  8. Wonder if cellophane is découpage-able.
  9. Settle on some lovely hydrangea-covered wrapping paper that you've been hoarding. The date on the paper says MCMXCIX. How ironic — it was probably on a wedding gift!

  10. Unfold the paper and realize that it probably was not on a wedding gift. Sigh.


Okay, blogoshere — what should I do? Can I still use this paper, in patches? How can I do that without it looking weird? Should I find something else I can just cut the full circle out of? Should I try painting again, instead? Would thicker coats of paint be good? Aaaggghh!

Separate question: have you had any success in printing things on an inkjet (quotes from old wedding cards, for example) and then découpaging them onto something without the text smearing and bleeding? I could hand-paint the quote instead, but [shudder].

Last question: do you have any idea what kind of determination it takes to reach for the Function and Alt keys with your pinned-down hand just so you can type an accented character while NAK? :p LOL

Monday, August 31, 2009


Here is my before-and-after for the Roadkill Rescue party by infarrantly creative:


"Wait," you say, "that isn't even finished! How lame!"

Well, savvy reader, there are two important tidbits which must be considered at this point. First, I will replace the "after" picture with the real "after" when the project is actually finished. Second, the contest didn't stipulate that the project had to be in hands-off finished mode in order to qualify. So, just in case life happens (HA!) and I don't get to paint more on my lazy susan today, I will still have a before-and-after to submit for the contest. After all, the new silver lazy susan already fits our style better than the fruity one did. Thank you, fruity-lazy-susan-giver, for providing me with a project to do! What an AWESOME gift!!! (seriously, no joke)

What? You think I should post another set of before-and-after makeover pictures that still fits the contest rules, just in case? Okay!


Ha! Yes, this makeover (on myself) technically fits all the stipulated rules of the contest. And hey, it's what I do! While I don't get to refinish furniture or refab yard sale finds on a regular basis, I do get to exercise a little creativity in making-over damaged skin and poor color choices. And it helps other women in the process — what a joy!

Saturday, August 29, 2009

How to Make-Over a Glass Lazy Susan, part 1
  1. Clean the styrofoam bits off the surface and rub with alcohol.

  2. Freak out about paint choices.

  3. Attempt to scuff surface with fine sandpaper.

  4. Do another alcohol rub.
  5. Get sandpaper grit all over forearms while leaning to reach keyboard to type steps 1-5.
  6. Put on Thoroughly Modern Millie soundtrack.
  7. Bite the bullet and mix Plaid Apple Barrel Colors Craft Paint in Pure Silver with DecoArt Multi-Purpose Sealer, then apply with a sponge brush.


  8. Repeat step 7, only more so.

  9. Enjoy the streaky effect.

  10. Wonder how flexible the "Let dry 1 hour" instruction is.
  11. Take 5 minutes to type steps 6-10, then touch the paint to see if it's dry.

  12. Attempt to fix fingerprint with brush; decide surface is dry enough for a second coat anyway.
  13. Make a mental note to do all future painting projects on a rotating stand.

  14. Wonder why paint won't stick to this one st*pid spot.

  15. Wonder if continually spinning the lazy susan as in the picture in step 13 would aid the drying process.
  16. Resist urge to touch second coat.
  17. Paint coat three with happily-opaque results.

  18. Realize you're leaning over your project to reach the keyboard; put on painting shirt.
  19. Mix more paint-n-sealer.
  20. Appreciate the freedom to wipe a drip of sealer right on your shirt...then hope it doesn't seep through onto nursing bra.
  21. Paint coat four.

  22. Debate what to paint on finished surface: swirls using dabs of paint and a static brush on a rotating surface? Taped-off geometric shapes? Freehand painted designs? A quote?
  23. Wonder whether just to use more sealer on top of finished piece or Anita's Water Clean-Up Polyurethane.
  24. Paint coat five. Resist urge to pour paint on top of surface and just spread it around.
  25. Hear baby wake up and cry. Push chair back to leave office. Hear toddler comfort baby with a shouted, "Perrin-Perrin-bo-berrin! Banana-fana-fo-ferrin!"
  26. Dip sleeve in paint on edge of surface by typing from new, pushed-back position.
  27. Attempt to fix dipped area.
  28. Fix attempted fix from step 27.

  29. Try to clean-up paint on edges by spinning the lazy susan against the brush, thereby creating a raised edge of paint on top of surface.
  30. Try wiping off new raised edge; spoil entire surface edge; fix new ickies with coat 5.1.
  31. Discover paint underneath surface of lazy susan (AKA stabilizing place to put fingers).

  32. Leave office to check on baby, show silver fingertips to toddler, and get mini dark chocolate Reese's cup. Close door to prevent kitty participation.
  33. Realize it has been the length of Monsters Inc. plus both shorts. Forgo chocolate and nurse baby.
End of Day One. Stay tuned!
Oooohhhh! I am SO excited!!!

One of the blogs I follow is so freaking awesome. It's called infarrantly creative, and it's by a red-haired Christian crafter! I log on to my Google Reader every day, just hoping she has posted something else — she's that awesome. Reading her blog is kind of like going to my happy place; I totally live vicariously through her über-crafty life.

So anyway, she's having a contest for her birthday (Monday) for her readers to "make-over" something they've found or received for free. I wanted to do it so badly, but I just couldn't justify spending the time when my house needs serious attention (not to mention my children and my business...oh, and my husband). However, Charlie and I decided that I could take 1 or 2 hours tonight to do it anyway, to juice up my creative-happiness so I'll have energy for the long tasks ahead. LOL

I even found something we'd received for Christmas 2008 that I'd intended to makeover, but never have (see ¶2). Pictures to come!

Saturday, July 25, 2009

Click here for a SERIOUSLY FUNNY post about breastfeeding and society's standards of "offensive". Everyone please please check it out — especially if you think it should never be done in public! :)

Speaking of BFing in public, I am so grateful for KY state breastfeeding law. That helped make it a lot less stressful for me to do my job (as a nursing mom) when I had to feed Perrin during traffic school this afternoon (12-3:45). Not only did I have the reassurance that I was doing exactly what I was supposed to be doing, I had freedom from fear of retribution. That's exactly what laws should do — protect citizens. None of the 43 class attendees cared anyway, which is awesome...not that they could even tell I was doing anything other than holding my baby. LOL I gave the instructor a heads-up before the class, but Perrin ended up wanting to eat exactly during one of our breaks, so the timing was a non-issue. I am so proud of our state, especially in light of what other states grudgingly provide to protect their nursing moms. In fact, KY recently passed an addendum to the law detailing the fines should someone "interfere with a mother breastfeeding her child" — $500 for the first offense and $1,000 for subsequent offenses! GO, KENTUCKY!!!

Caspian just astonishes me, every day, with his precociousness. He came up to me tonight and chanted, "All for one and one for all! We are the three Musketeers!" Then he looked into my eyes and stroked my arm as he asked, "Remember that song, Mommy? Do you remember that?"

He also looooves playing with my pink Mary Kay Cadillac business card holder (which I earned as a prize). He asks to play with it every time he's in my office: "Excuse me, ma'am — can I hold your Mary Kay car, ma'am...please?" Seriously, he says it just like that, every time.

Last Saturday, I told him we'd get to see a REAL pink Mary Kay car at our unit potluck at my director's house. He was ridiculous excited at that prospect. When we arrived, the garage was open enough for him to see the bottom of the car (a pearl pink Cadillac SRX), and he thought that was the coolest thing ever. However, being almost 3, he immediately got distracted by people, food, and cornhole. I'd totally forgotten about the whole car thing, but when we got in our minivan to leave, he got pretty upset (like, crying) when we left without getting to sit in the Caddy. Yes, my son
cried because he didn't get to ride in the pink Mary Kay car. *sigh* Yesterday, I asked him if he wanted to do anything special for his birthday this Sunday, and out of nowhere he exclaimed, "I want to sit in the REAL pink Mary Kay car!" LOL He'll be thrilled when we get to the expo at Seminar next week and he gets to sit in all the MK cars! Can't wait to give him a ride in our family's own "REAL pink Mary Kay car" someday.

Friday, July 24, 2009

We made the trip to Levi Jackson State Park in London, KY on Tuesday to meet with the Cole Family for a joint 3rd-birthday cookout for our toddlers (who share a birthday). I can't believe Caspian will be 3 on Sunday. The park and the visit were sooooo awesome! First off, we L-O-V-E the Cole family. Second, Ed Cole snagged us a picnic shelter that had real bathrooms and a playground. Third, the food was really, really good. Fourth, the weather was perfect. Fifth, we L-O-V-E the Cole family. We all had a blast, and the London exit off 75 has pretty much every business that we'd need should we decide to stay overnight there some time. London is exactly halfway between Wilmore and Knoxville, so it's now our official meeting place. We're even going to visit the World Chicken Festival in September! It's going to be so exciting getting to create these family memories together in the years to come.

Because I'm too tired to reorder them, here are the photos in reverse-alphabetical order according to their file names (which is how they uploaded):

Caspian enjoyed sliding at the state park playground


His hair enjoyed the static it created.


Caspian wore his birthday apron to help crush crackers for tuna cakes.


Dueling Potties! This was not even staged, folks. Two toddlers, one birthday. Two potties, one brand. Two snacks, one fruit. Heck, even their clothes matched! LOL


We got a chocolate truffle cake from Wal-Mart for their birthday cake (heck, $8 for a Bill Knapps replacement cake? no-brainer). Caspian and Charlie shared a piece, but Caspian turned it around and ate all the icing off the end when Charlie left to change Perrin's diaper.


Beautiful Becky Cole holds my Perrin.


Perrin's 3-month well-baby checkup was this morning. He weighs 15lb 11oz and is 24.5" tall! The doctor proclaimed him "perfect" and said he's doing so well, we don't need to come back until 6 months. Perrin loves to sing along with me when I sing to him. He's so full of joy and expresses opinions on everything. I think his teeth are starting to bother him, as he bit me while nursing for the first time on Monday and he chews his hands even when he's not hungry (which causes the drool factor to go up).

Caspian pooped in his potty for the FIRST TIME EVER yesterday! How odd to think that it's the first time in his life he didn't do it in his pants. Anyway, we had quite a few runaround days last week, and his potty training totally regressed since he's only comfortable using his own little potty (not big strange toilets). Yesterday was a "naked day" so he could get used to sitting on the potty again when the urge hit. We'll get there!